News and Updates

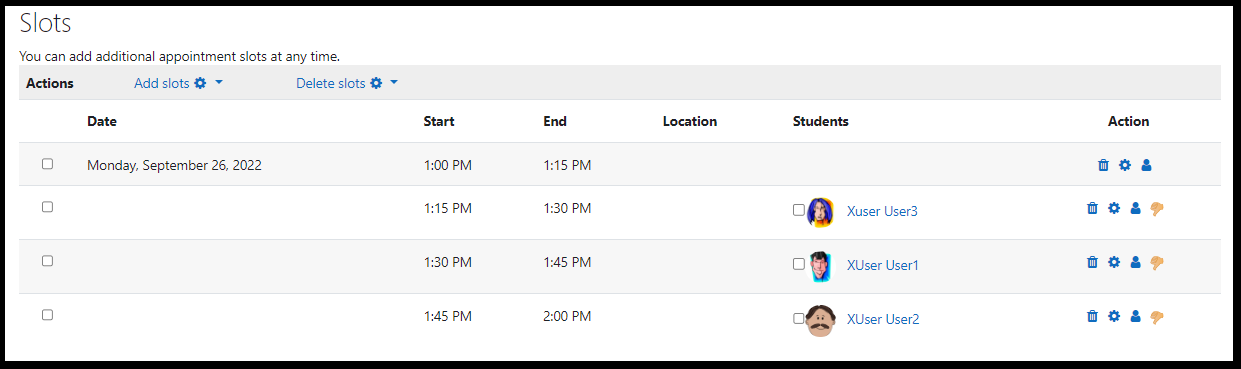
Stay on track with Moodle calendars

Did you know that there are calendars available in multiple spots on Moodle to help faculty and students stay on top of deadlines and due dates? You can even choose to sync your Moodle calendar with Google.

Dashboard Calendar

The first place to find a calendar is on the Dashboard. Here you’ll find both a timeline that shows upcoming activities that require attention and your calendar. You have the option on your calendar to view all activities at once, or to sort by individual courses. All calendars also include the Academic Calendar. Any activity or assignment from a course you are associated with that has a due date assigned to it will show up on your calendar.

Calendar Block

If you would like students to have access to the calendar while they are in your course, you can also add a Calendar Block to your course. The calendar block will be in the block drawer on the right side of the page for your course. This will show deadlines and due dates for upcoming activities and events in all courses the user has access to. To add the calendar block, use the following steps:

  1. Open your course
  2. Turn Edit Mode On
  3. Open the Block Drawer
  4. Click Add a block
  5. Select Calendar

Add your Moodle Calendar to your Google Calendar

If you find yourself going back and forth between your Moodle calendar and your Google calendar, trying to keep things on track, this next tip will make things a lot easier. You can add your Moodle calendar to your Google calendar and your deadlines will show up alongside any content you have built into your Google calendar. This must be set up by each individual user, and can be used by instructors and students.

    1. Login to Moodle and open your Dashboard. Scroll down to the calendar at the bottom of your page.

    2. Export your Calendar.
    Below your calendar, select Import or Export Calendars. You will be prompted to select the events you want to export and the time period. We recommend choosing All events and Recent and next 60 days, then select Get Calendar URL. Copy the URL for the next step.

    3. Add the Calendar to Google
    Open your Google calendar. On the left side of your screen, scroll down to Other Calendars and click the plus icon. Select From URL. Paste the copied URL here and add the calendar. The new calendar will show up under your list of Other Calendars.

    Tips:
    Updates to deadlines/due dates in Moodle will have a delay on your Google calendar, so refer to Moodle for the most up to date information.

    You can rename your Moodle Calendar in Google by going into the calendar’s settings.

    Schedule meetings & office hours with Moodle Scheduler

    Moodle Scheduler allows students to sign up for a time slot right from within Moodle. Features of the Moodle Scheduler plugin include:

    • Notifications to teachers when a student books or cancels an appointment
    • Reminders to students of upcoming appointments
    • Web form for sending invitations or reminders to students who did not yet make an appointment
    • Booking appointments in groups
    • Limits on when a student can modify/cancel their appointment
    • Grading (if appropriate)

    Find instructions for setting up Scheduler at:

    Or watch this helpful 10 minute video.

    Moodle 3.11 upgrade highlights

    In June, Moodle was upgraded from v3.10 to v3.11. Changes resulting from the upgrade are highlighted on Moodle 3.1 (Summer 2022). Most notable is the change in the visual representation of activity completion from a checkbox to a “Mark as Done” button.

    Other changes include:

    • Ability to hide or show activity start and end dates and completion conditions on the course home page 
    • Time saving measures when building quiz questions
    • Addition of Panopto activities for linking to or embedding videos

    Lastly, a reminder that Ensemble MediaLibrary has been replaced by Panopto as Colgate’s video hosting platform.  See Using Panopto with Moodle and Replacing Ensemble Video Links with Panopto for more information. 

    Please contact the Moodle support team at ITSHelp@Colgate.edu with questions.

    Ensure access to PDF documents

    Often books or paper documents are photocopied and saved as a PDF in such a way that results in an “image” of the document rather than real text.  Image-based PDFs can also result if a digital document printed to Adobe PDF.

    People who have low vision, blindness or those who struggle with reading may use assistive technology which converts text to speech. A document which is an image of text rather than real text is not usable by most types of text-to-speech tools.  Converting a text-based document to an audio file also makes it easy for students to listen to the document when they are traveling, if they have eye fatigue or potentially while working out.  

    You can determine whether the document is an image or real text by dragging your cursor over the text. If you can highlight the text, line by line, then it is probably real text.

    example of scanned text showing individual words highlighted
    Incorrect

    If you drag your cursor over the document in Adobe Reader and a box is drawn around the text, or if you are in a browser window and you are not able to search for an obvious word like “the”, then it is likely an image of text.

    scanned text with highlight covering a block of text rather than individual lines

    Colgate subscribes to SensusAccess, a web-based tool that will convert an image-based PDF to a text-based PDF or several other formats, including audio (MP3), Microsoft Word (DOCX), plain text (TXT), Braille and HTML. SensusAccess can be used by anyone with a colgate.edu email address.

    Find more information about SensusAccess on the Colgate.edu website.

    SensusAccess is also available in Moodle where Moodle course documents can easily be submitted to SensusAccess for conversion to alternative formats.

    screenshot of moodle course home page showing link to sensusaccess

    Add an attractive header image to your course

    Moodle tends to be bland in appearance.  Follow the steps below to add some color and personality to your Moodle course by incorporating an attractive header to the course home page as in this example. 

    1. Find an image.  Search for images that convey the theme of your course (be aware of copyright).  Alternatively, create your own image using PowerPoint or other graphics tool.  Save the images as a file (jpg, png, etc.).
    2. In your Moodle course, turn editing on.
    3. In the first topic of the course, initially labeled ‘General, select the “Edit” link, then choose “Edit section”.

    4. Select the “Custom” checkbox and add a welcoming Section name.

    5. In the Summary area, choose the Insert image button on the toolbar.

    6. In the pop-up window, choose Browse repositories and upload the image file you saved.

    7. Provide a description for the image or, if the image is strictly decorative, check the box. Set the Alignment to “Top”. Once you save these settings and see how the image fills the space on the course page, you can return to modify the Size settings to better fit the page. Generally, 1000 x 300 provides a good fit. Checking the “Auto size” setting will ensure that the image maintains the original height to width ratio as you change the Size settings. Select “Save image.”

    8. Scroll to the bottom of the page and select “Save changes“.

    css.php